|
3DX
INTERACTIVE LAMPLIGHT
Download
the TableLamp.msq.zip
(47KB), and then load this in Motion Editor. The file scene
is already been set and textured all you have to do is to
modulate the light and Animate surface attributes in the scene.
After that you will set the animation groups for each event
then convert the scene to 3DX.
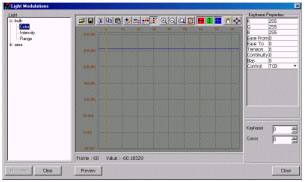
- First
modulate the light; open the Light Modulations window
in the Object menu then select bulb, and then
under blub list select Color to modulate then
click Modulate button. On the track editor add keys
4,5,6,9,10,11,14,15,16,19,20,21.
Input
the following settings for the selected keys:
For
key 5 input values for: R 255, G 255,
B 255 for lighter color.
For key 10 input values for: R 59, G 59,
B 255 for blue color
For key 15 input values for: R 255, G 595,
B 59 for red color
For key 20 input values for: R 59, G 255,
B 59 for green color.
This
will change the light color when triggering events.
Next,
under Color select Intensity, click on Modulate
button then insert keys 4 and 5. Select the
key 5 then change the Intensity value to 1
(this is the maximum intensity of the light).
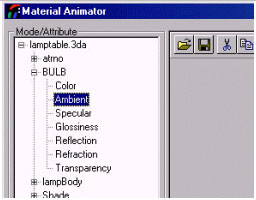
- To
Animate the surface attribute;
For
the attribute open the Material Animation window
in the Render menu. Click on lamptable.3da
and then select BULB on the attribute list, then
on the surface property list select Ambient to animate,
then click on the Animate button. On the track
editor insert keys 4 and 5. Select the key
5 and change the RGB value by R 255,
G 255, and B 255.
Select
another attribute; Shade, select Ambient to
animate, then apply the same settings you made for the bulb
light object.
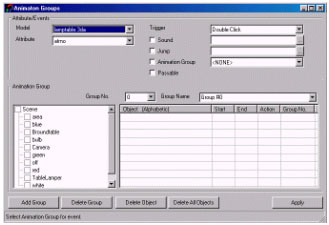
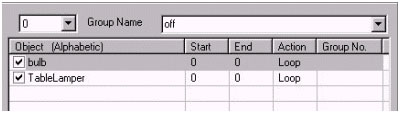
- To
set the animation groups open the Animation Groups
window under Keyframe menu.
You
will be using only 2 objects for all the groups namely
the bulb and TableLamper, so drag this two
objects towards the group list when adding groups. Select
the Loop behavior for the Action, apply this
to all the groups. Change only the Start and End
value for each group added.
Apply
settings as follows:
For
the group name Off input a value of 0 for
the Start and End options.
For the group name White input a value of 5
for the Start and End options.
For the group name Blue input a value of 10
for the Start and End options.
For the group name Red input a value of 15
for the Start and End options.
For the group name Green input a value of 20
for the Start and End options.
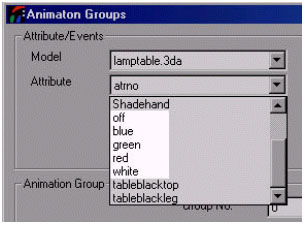
- To
set the events, on the Attribute list you will notice the
five group names is already listed as an attribute name
(off, white, blue, red, green).
Apply
a group name for each of the five attributes, select only
a group name that carry the same name as the attribute in
the Animation Group list.
On the
Trigger option select only by Click, apply this to
all five group events. After that click on Apply
to initialize settings then your ready to convert the scene
to 3DX.
- To
covert files to 3dx open the File menu and select Export
3dx, and then save the file.
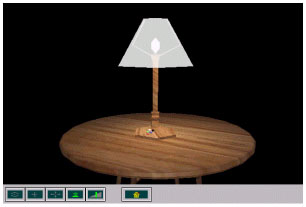
- To
activate the lamp just click on the five colored button
at the lower part of the lamp.
To
see the finished version of the table lamp down load the
TableLamp.3dx.zip
(22KB) file.
|